What is the PSA method?
PSA stands for perfect sensitivity approximation.
And it can help you find a mouse sensitivity that’s right for you.
The PSA method has been used in the mouse sensitivity community for years, from old arena shooters such as Quake.
Of course, the PSA method can also be applied to Fortnite (and any shooter game, really). And it’s certainly a far better method than guessing your sensitivity or picking a random number.
In this guide, I will be explaining how you can use the PSA method the “manual” way. But the calculations involved can get a little tricky because you need to do several iterations, so it’s easy to get lost and confused.
That’s why I’ve created a free PSA method calculator using Google sheets to make things easier for you. You should open that sheet in a separate tab now.
Bear in mind the sheet is view only and you’ll need to make a copy to be able to use it. And with the sheet alone you will not know what to do next.
But when you read every word of this post, you’ll learn how to use the PSA method to find a sensitivity that feels good for you.
Note: It’s important you only use the PSA method when “cold”. In other words, when you aren’t warmed up. Otherwise, you’re just going to find the sensitivity you warmed up with.
If you’re warmed up now then I recommend you return to this guide later. Or in the morning when you have some time to complete it properly.
Finding your starting sensitivity
To begin using the PSA method, you need to get a “base” sensitivity to use for your calculations.
Now, you could use the sensitivity you currently use in Fortnite.
But I don’t recommend that.
The reason for this is that you will have some bias in favor of your current sensitivity (since you’ve probably been using it for a long time).
Instead, your base sensitivity should be one that completes a 360 degree turn in-game when you move your mouse from one end of your mouse pad to the other.
You can use the compass at the top of your screen to help ensure you’re turning the right amount.
Your base sensitivity will depend on the mouse DPI you use and the size of your mouse pad. For example, if your mouse pad is 40cm wide and you use 800 DPI, then your Fortnite sensitivity would need to be roughly 0.05 to turn a full 360 from one end to the other.
If you have a very large mouse pad (say a meter long) then just move your arm as far as you comfortably can. And if you have a tiny one then I suggest you get a larger mouse pad for playing Fortnite because you need a lot of space for moving your mouse.
Anyway, you’ll likely need to do a few adjustments to get your base sensitivity. And don’t worry if it’s not exactly right because getting close enough is fine.
Another thing I recommend for the PSA method is that you use your eDPI (effective dots per inch) instead of your actual Fortnite sensitivity. You can calculate your eDPI using my online calculator.
The reason for using eDPI is because your Fortnite sensitivity is likely very low (say 0.05). And this can create rounding problems when using the PSA method.
Of course, you could calculate your eDPI manually by multiplying your Fortnite sensitivity by your mouse DPI. So, using the previous example of 800 DPI and 0.05 Fortnite sensitivity, the eDPI would be 40.
Now that you have your base sensitivity in terms of eDPI, you can start using the PSA method.
The first iteration
For the first part of the PSA method, you’re going to take your “base” sensitivity and multiply it by 0.5 and by 1.5.
This will give you two new values. An upper value and lower value.
By the way, you’re going to be doing several iterations. So you may want to get a piece of paper and a calculator for this or open my PSA method calculator in Google sheets to make it easier.
Continuing with the previous example of 40, you would have values of 20 (lower) and 60 (upper).
Now you’re going to test your sensitivity at the lower and upper value and see which one feels best for you.
But how should you test your sensitivity?
Well, you have some options:
- Tracking a stationary target – Spawn a bot and then move around while trying to keep your crosshairs on the target at all times. Do this at different distances (close, medium, and far).
- Do a run of an aiming course – There are many aim courses in Fortnite creative mode you can try. Just make sure you do the same course each time you test.
- Start building – You can either free build in your own creative map or follow a course specifically designed for building and editing. The choice is yours.
Because building, aiming and editing are all very important parts of Fortnite, it could be worth you spending time testing each of them in isolation.
You only want to spend a few minutes in the testing phase (otherwise the whole PSA method could take a long time). So set a timer on your phone and test each sensitivity for the same amount of time.
Try your best to eliminate any bias when testing as well. In other words, have an open mind and don’t go in with the assumption that you’re going to prefer one value over the other.
After you’ve run your tests, you should be able to feel which sensitivity is better for you. The upper or lower value.
Let’s say you preferred the lower value. What do you do next?
Well, the second iteration, of course.
The second iteration
Say you prefer the lower value. In our example, this would mean you prefer an eDPI of 20 over 60.
Then, for the second iteration in the PSA method, you would add your preferred value (20) to your base value (40) and then divide by 2.
20+40 is 60.
60 divided by 2 is 30.
Easy math.
Next, take this new value (30) and do as you did before. That is, multiply it by 0.5 and 1.5 to get a new lower and upper value for testing.
In our example, you would get 15 and 45.
You see, it’s quite confusing when you try to do it manually, and that’s why I recommend you use my spreadsheet.
So with these new values, you’re going to run the same tests as you did before and see which you prefer. Now the sensitivities you’re testing here could actually feel worse than the previous values you tried.
That’s ok. Don’t panic.
Because through using the PSA method and further iterations, you’re going to eventually converge to the sensitivity that’s right for you.
So continue onward and trust that everything is going to work out just fine.
The third iteration
Now let’s say in the second iteration you preferred the higher value (45).
You would then add this to your base value from the second iteration (30) to get 75.
Can you guess what to do next?
If you said multiply this new value (75) by 0.5 and 1.5, you would be wrong.
Actually, for the third iteration you’re going to multiply by 0.6 and 1.4.
You see, we’re eventually going to be converging to 1.
So you would have 22.5 and 52.5 as your new upper and lower values.
Then you go and do your tests again to see which value you prefer.
The fourth iteration and beyond
I’m sure by now you’re beginning to get a feel of what you’re supposed to be doing.
Take your preferred value (upper or lower) and add it to the base value from the previous iteration. Then, multiply this number to get new upper and lower values.
So I no longer feel I have to walk you through each step of the PSA method.
You’re free.
But you do need to know what values to multiply for each of the following iterations.
Here are the values you will need to multiply by:
- Iteration 4: Multiply by 0.7 and 1.3
- Iteration 5: Multiply by 0.8 and 1.2
- Iteration 6: Multiply by 0.9 and 1.1
- Iteration 7: Multiply by 0.95 and 1.05
After the 7th iteration, you will have found your “perfect sensitivity” according to the PSA method.
If you’re using my PSA method calculator, you would end up with something that looks like this:
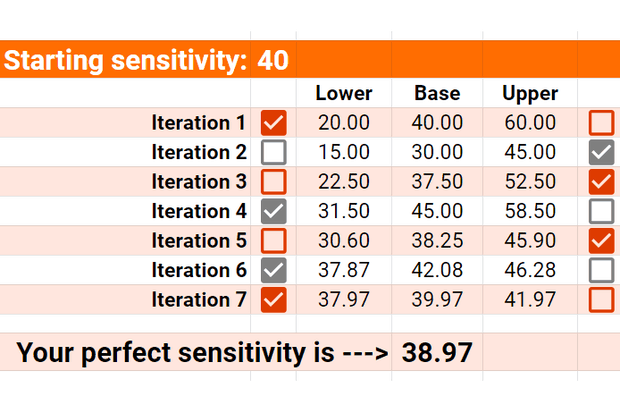
Well done. I know that was a lot of work, but it was worth it. Right?
Conclusion
Finding the perfect sensitivity takes time and effort.
Imagine you spent your entire time playing Fortnite with the same sensitivity (as a lot of players do). How would you know there isn’t a better sensitivity for you?
You see, using something like the PSA method can help make the process of finding a good sensitivity easier because it forces you to try new sensitivities.
And through your sense of feel, you will begin to naturally converge to a sensitivity that feels good to you.
With your new sensitivity, you can start using these ways to improve your Fortnite aim.
You may have noticed I didn’t say to use Kovaak’s FPS Aim Trainer when testing your sensitivity. This is because you get a score when playing Kovaak’s.
And I didn’t want this score to influence your decision. Instead, you were supposed to go based on your feelings.
If you want to play Kovaak’s now using the sensitivity you found using the PSA method, go ahead. I think it’s the best aim trainer available and will be excellent for you.
Of course, you may still be unsure if the sensitivity (eDPI) you are using is any good for Fortnite. So I’ve analyzed hundreds of pro players and created the ultimate guide to Fortnite sensitivity for you to read next.
Anyway, I hope you’ve found this guide to the PSA method helpful. You can subscribe to Kr4m on YouTube for more Fortnite content or follow me on Twitter for the latest updates.
Leave a comment down below with the sensitivity you found when using the PSA method. Or let me know if you have any questions and I will respond to you.
Comments
is this for the x or y axis
You can use it for both because I recommend you keep your x and y axis sensitivity the same.