
Escape The Dream 2 is a Fortnite Escape Room created by JAG and the code is 4554-3196-9055.
It’s the follow up to the original Escape The Dream.
And it’s longer and more difficult than the original.
So, you could get stuck. Now I recommend you try and complete it without any help. Because it’s much more satisfying and rewarding when you do it yourself.
But, if you’re truly stuck and need help, then I’ve broken down each of the sections for you.
1. Bot Area
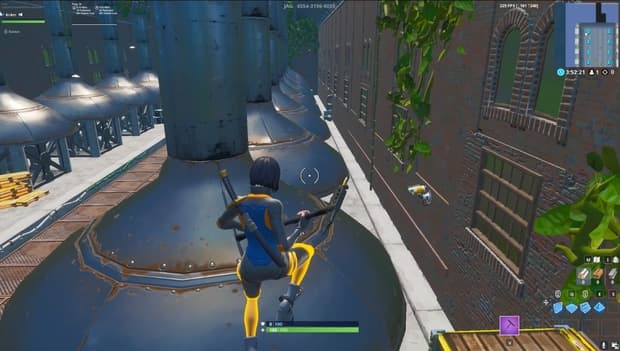
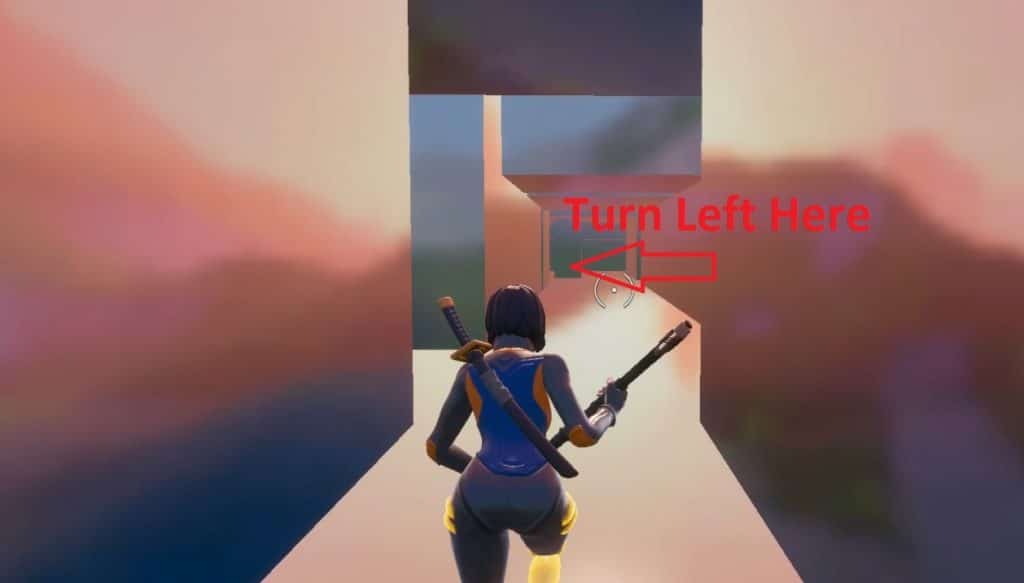
After you open the first few doors, you will be at a long corridor with bots either side of you.
The bots can shoot and kill you, so you want to avoid them.
You can do this by bouncing on the tires to the right as soon as you enter.
And then you can run safely along the top to reach the end. There’s some room at the end, but that’s only to trick you.
What you really need to do is climb up the vine on the right. I recommend you face the wall as you walk up because it means you can’t fall.
When you make it to the end, you need to climb up the vine at the end. I recommend you face the wall as you walk up because that increases your chances of not falling.
Then you will open a door and be at the door maze.
2. Door Maze
There are 3 floors of the door maze.
You are looking to get to the stairs to climb upwards.
And each floor is longer and more complicated than the one before it.
Here is how to navigate each floor and get to the next section.
Door maze floor 1
This floor is the most simple.
Just do this:
- walk 5 doors forward
- climb the stairs
- turn around and jump to the next floor
It’s very important that you turn around and jump to the next floor. Because that’s where we’re going to start for the instructions to floor 2.
Door maze floor 2
This floor is a little longer, but not too difficult.
Here is how to complete it, starting from the first door you opened:
- 4 doors forward
- 3 doors right
- 1 door right
- 1 door right
Now you will be at another set of stairs ready for floor 3.
Dore maze floor 3
This is the final floor and it’s longer and more complicated than the others.
But you only need to follow these simple steps after opening the first door:
- 3 doors left
- 4 doors right
- 5 doors left
- 2 doors left
Now you will walk onto a pad which means you have reached a checkpoint.
So, when you die, you will respawn here.
You see, the next section is the “disco death floor”.
3. Disco Death Floor
Here are the floor puzzles, which are actually a memory puzzle.
Listen, you can figure this out yourself. But it’s probably going to take at least a dozen attempts before you get all the way.
So, if you want a quick guide, here’s what you need to do for each floor.
Disco death floor 1
Your objective is to get to the ramp right in front of you to get to the next level.
Here’s the route you need to follow:
- 1 floor forward
- 1 floor right
- 1 floor left
- 1 floor right
- 2 floor left
- 2 floor left
When you reach the end, you need to jump on the sign either side of the ramp.
Because the floor of the ramp is dangerous and it will kill you.
But don’t worry because you only go back to the start of the floor, where you stood on the green platform.
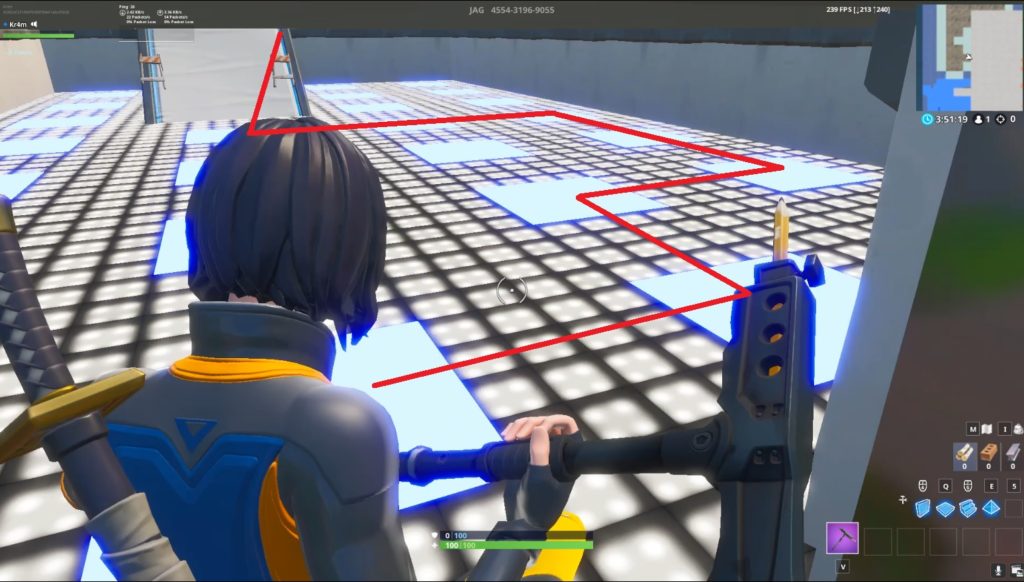
Disco death floor 2
Start on the square to the right and follow this sequence:
- 2 floors forward
- 2 floors left
- 2 floors left
- 3 floors right
- 2 floors left
- 1 floor left
- 2 floors right
- 2 floors left
- 2 floors left
- 2 floors right
- 1 floor right
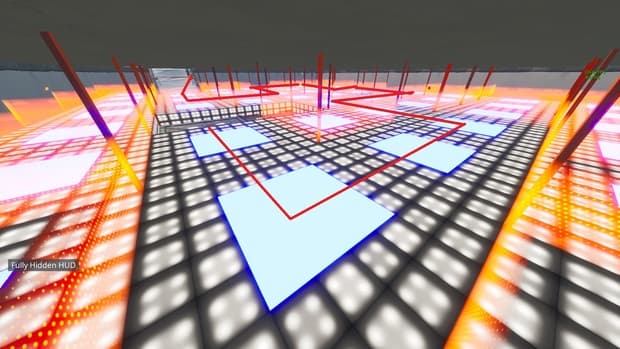
Disco death floor 3
This floor is the longest and most difficult.
And I even get an OK photo of it in the replay mode to show you.
But start on the square closest to the wall then follow these exact steps and you will get to the end.
Start on the square closest to the wall and follow this sequence:
- 4 floors forward
- 2 floors left
- 3 floors right
- 1 floor right
- 2 floors left
- 2 floors left
- 2 floors right
- 3 floors left
- 3 floors left
- 2 floors left
- 2 floors right
- 2 floors right
- 2 floors left
- 1 floor left
- 3 floors right
- 2 floors right
Congratulations, you have completed the disco death floor puzzle things!
Now you should have fallen into the “white room”.
4. The White Room
The white room is obviously completely white.
It’s very disorienting because it’s hard to know where you are.
Unfortunately, I can’t tell you exactly how to get out of here. But I can give you some general tips that could help:
- Navigate yourself by using your mini-map in the top left corner
- Equip your floor building piece to see where you can walk next
After a few minutes, you will find the spot where you fall down.
Then walk forward until you get to the bounce room.
5. Bounce Room

Your objective here is to bounce around to get high enough to reach the platform at the top.
Here’s my method that works every time:
- Start by bouncing on the pad on the floor to the right
- Bounce on each wall to get higher
- Pull your glider when required to maintain max-height
This should only take you a few attempts and then you will be in the next section.
6. Staircase Maze
This is probably the easiest and most straightforward part of Escape The Room.
You’re aiming to get to the stairs in the top left corner where there is an ice pillar.
Now crouch through the tunnels and you will get to the snow area.
7. Snow Area
This area fooled me for a while.
And I suggest you take a few minutes trying to figure it out yourself, before reading on to see the solution.
You see, I took me a few laps and then I started to jump on things. Do I jump on the throne? One of the torches?
Aha! It’s one of the torches.
It’s actually the very first torch you need to jump on as you enter the room. Then turn around and jump up to get to the next section.

8. The Logs
I love this section just because the area looks so pretty.
And, actually, the logs are the one before the last section.
But, listen up, because you have 3 options: You can either go left, middle or right.
Here is where each option leads you:
- Left – Takes you to the mirror maze
- Middle – Takes you to the darkroom maze
- Right – Takes you to the launch pad climb

I recommend you take the left log to the mirror maze because it’s the easiest. But each log can get you to the end.
So I will start by explaining the mirror maze and continue reading to learn how to complete the other sections, too.
Mirror Maze
As I said, this is the easiest one.
There’s only 2 steps.
From the start, here’s what you need to do:
- Take the third left that is next to the pillar in the middle
- Take the first right
Then you simply need to follow it to the end and you will get to some vines (remind you of anything?) All you need to do is crouch down and you will be at the end.
In the end room there is an area that reads “new path”. When you walk into it you will die and respawn back at the logs. So you have the option of attempting either of the other ways to the end.
Darkroom Maze
The middle log will take you to the darkroom maze. It’s like the white room, but dark.
It’s fairly straightforward, however, it’s not easy to explain because it’s dark and I can’t explain exactly where to go.
I can recommend to turn your brightness up in your Fortnite settings to help see a little better. Moreover, equipping a building piece could be useful.
Continue following the maze and you will pass sections of bright lights to indicate you are going the right way.
When you get to the end you will be at the stairs of the end room. Well done.
The Launch Pad Climb
The right log takes you to the hardest of the 3 levels: The Launch Pad Climb.
This one’s dark too, so you’re pretty much on your own. But I do have some hints for you that could help:
- Turn your brightness to the max to help see in the dark
- Look down at the floor to see the next launch pad and to tell if you’re going upwards
- Remember the direction you came from to avoid doubling back on yourself

Once you reach the end of the launch pads, you will get to some bounce pads and freefall into the final room.
Conclusion

Congratulations! You have managed to Escape The Dream (again, if you have played the original).
If you’ve enjoyed this map then you can use the creator code: JAG in the Fortnite item shop. This helps support the creator when you spend V-bucks.
This map took JAG more than 80 hours to create. And if you’ve enjoyed it, using his code is a nice way to show your appreciation.
How long did it take you to Escape The Dream? Let me know down below!