Do you want to know the best Fortnite controller settings?
You’ve come to the right place.
In Chapter 2, Fortnite introduced advanced controller settings that left many players confused.
So I analyzed more than a dozen of the best Fortnite controller players. For example, Sway, Unknown, Wolfiez, Scoped, and more.
In this post, I want to share with you what I’ve learned to help you optimize your controller settings, sensitivity, and binds.
Controller settings
I have a post that goes into detail about the best Fortnite settings to use.
And here I want to give a summary of the settings that controller players should be using.
You see, there are a bunch of hidden settings that you won’t find in the controller options section.
I’m going to assume you already have your Fortnite video settings optimized to increase your FPS so here we’re going to be tweaking the game settings that you can find in the second tab with the cog icon.
Under the movement section, you want to use these settings:
- Toggle Sprint: Off
- Sprint By Default: On
- Sprint Cancels Reloading: Off
- Auto Open Doors: On

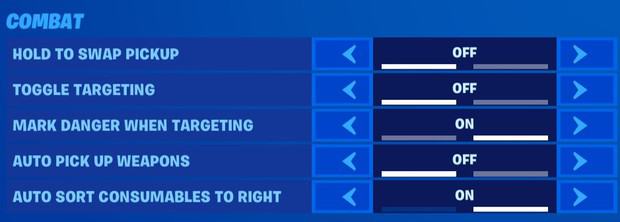
For the combat section, you want to use these settings:
- Hold To Swap Pickup: Off
- Toggle Targeting: Off
- Mark Danger When Targeting: On
- Auto Pick Up Weapons: Off
- Auto Sort Consumables To Right: On
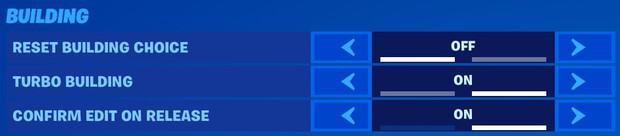
And for your building settings, you want to use these:
- Reset Building Choice: Off
- Turbo Building: On
- Confirm Edit On Release: On
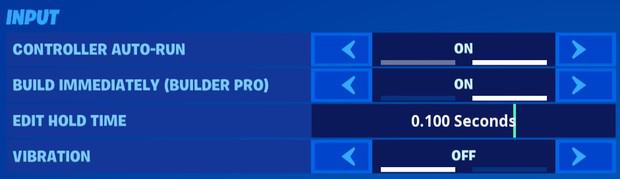
Now that you have your Fortnite game settings optimized for controller players, you can select the controller options tab so we can set up your input settings.
- Controller Auto-Run: On
- Build Immediately (Builder Pro): On
- Edit Hold Time: 0.100 Seconds
- Vibration: Off
For an explanation of what all these settings do and why you should use them, I suggest you read this post.
Now that you have all your controller settings configured, let’s move on to your sensitivity.
Controller sensitivity
Listen, there is a lot of personal preference when it comes to your sensitivity.
So instead of giving you an exact value to use, I want to give you a suggested range.
Selecting a number within the suggested range is going to work well for the vast majority of controller players.
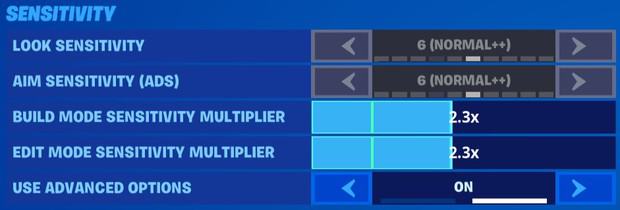
In this first sensitivity section, you’re only going to be choosing your build mode and edit mode sensitivity multiplier. Because you’ll be using the advanced options to fine-tune your other sensitivity settings.
- Build Mode Sensitivity Multiplier: 1.7x-2.5x – This is a multiplier applied to your look sensitivity when in build mode. You want to use the highest number that you can comfortably use while still having good control when building.
- Edit Mode Sensitivity Multiplier: 1.7x-2.5x – This is a multiplier applied to your look sensitivity when in edit mode. I suggest setting this to the same value as you use for your build mode sensitivity multiplier for consistency.
- Use Advanced Options: On – This will allow us to further fine-tune your look and ADS sensitivities, so read on to learn what to set those as.
In the next section, you’ll be setting your look sensitivity. As a rough guide, you want your build mode and edit mode sensitivity when multiplied by your look speed to equal to between 1 and 1.2.
For example, if you use a 50% look speed, you’d want your build mode and edit mode sensitivity multipliers to be between 2.0x and 2.4x.
Alternatively, if you use a 2.5x build and edit mode sensitivity multiplier, you want your look speed to be between 40% and 50%.
Advanced – look sensitivity
Now let’s move on to setting up your look sensitivity.
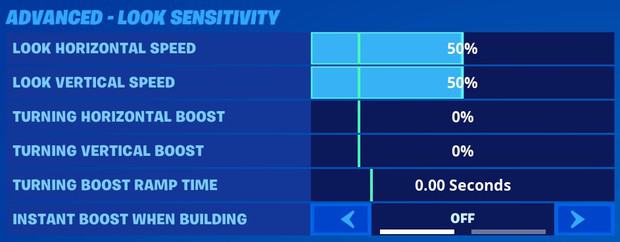
- Look Horizontal Speed: 40-60% – This sets how quickly your view rotates left and right. Set it lower for less speed and more control and higher to move faster. 50% is a good starting point and I don’t recommend going lower than 40% or higher than 60%.
- Look Vertical Speed: 40-60% – This sets how quickly your view rotates up and down. I recommend setting this the same as your Look Horizontal Speed for consistent movements in the horizontal and vertical axes.
- Turning Horizontal Boost: 0% – You can apply an additional left/right rotation speed when your look stick is fully deflected. But every top controller player sets this at 0% to disable the horizontal boost and so should you.
- Turning Vertical Boost: 0% – You can apply an additional up/down rotation speed when your look stick is fully deflected. But every top controller player sets this at 0% to disable the vertical boost and so should you.
- Turning Boost Ramp Time: 0.00 Seconds – This is the time it takes to reach the boost speed when your look stick is fully deflected. As you’re not using a boost this setting doesn’t matter but set it to 0 seconds anyway.
- Instant Boost When Building: Off – You can enable this setting to ignore the boost ramp when in build mode. As you’re not using a boost this setting doesn’t matter but set it to off anyway.
Some controller players do set their look speed higher than 60%, with some players going as high as 80%.
I don’t recommend going over 60%. But if you decide to use higher look speeds, then make sure you adjust your build and edit mode sensitivity multipliers to compensate.
Advanced – aim down sights (ADS) sensitivity
Next, we’ll be setting up your aim down sights (ADS) sensitivity.
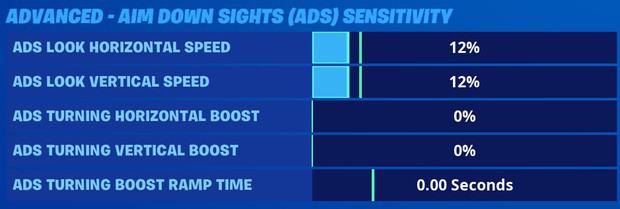
- ADS Look Horizontal Speed: 8%-16% – This sets how quickly your view rotates left and right when aiming down sights. You want this much lower than your standard look horizontal speed to have more control when you ADS.
- ADS Look Vertical Speed: 8%-16% – This sets how quickly your view rotates up and down when aiming down sights. I recommend setting this the same as your ADS Look Horizontal Speed for consistent movements in the horizontal and vertical axes.
- ADS Turning Horizontal Boost: 0% – As before, this applies an additional left/right rotation speed when your look stick is fully deflected. But every top controller player sets this at 0% to disable the horizontal boost and so should you.
- ADS Turning Vertical Boost: 0% – As before, this applies an additional up/down rotation speed when your look stick is fully deflected. But every top controller player sets this at 0% to disable the vertical boost and so should you.
- ADS Turning Boost Ramp Time: 0 – This is the time it takes to reach the boost speed when your look stick is fully deflected. As you’re not using a boost this setting doesn’t matter but set it to 0 seconds anyway.
As a rough guide, you want your ADS look speed to be between 20% and 30% of your standard look speed.
For example, if you’re using a 50% look speed, you’d want your ADS look speed to be between 10% and 15%.
Advanced – sensitivity
And here we’ll be making the final tweaks to your sensitivity.
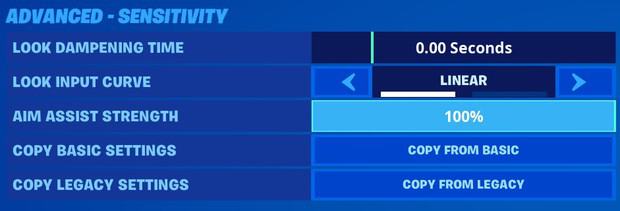
- Look Dampening Time: 0.00 Seconds – This is the time it takes to reach the expected look rotation speed after applying initial input to your controller’s look stuck. Set it to 0 seconds to disable the dampening.
- Look Input Curve: Linear – Defines how input from your controller’s look stick is processed. Linear uses the raw stick input and exponential causes smaller stick movements to have less of an effect. This is sort of like mouse acceleration for mouse users. All the best controller players use linear as your raw input is more consistent.
- Aim Assist Strength: 100% – This is how much aim assist to apply so use the highest value, which is 100%. You can set it to 0% to disable aim assist, but I don’t recommend it.
Controller deadzone
The deadzone is the area surrounding your stick that Fortnite ignores input from.
Setting this value too low may result in your character continuing to move (for move stick deadzone) or your camera continuing to move (for look stick deadzone) even after you remove your finger from the stick.
Here are the ranges I recommend using for your controller deadzone:
- Move Stick Deadzone: 6%-12%
- Look Stick Deadzone: 6%-12%

I recommend setting your move stick and look stick deadzones to the same value.
But some controller pro players like to set the look stick deadzone less than the move stick deadzone. So you may need to experiment to find your perfect values.
Foot controller
Unless you use a foot controller, you just want to turn this off.

Controller binds
So now that you have your controller settings and sensitivity sorted, let’s talk about controller binds.
Your controller binds are your button configurations. They’re the same thing as what keybinds are for keyboard and mouse players.
For a while, controller players could only use the default configurations. When I first started playing Fortnite on a PS4 with a controller, the default options were terrible.
But then came combat pro, which was an improvement.
And later came builder pro, which was an improvement again. With builder pro you have each building piece on your back buttons to allow for fast building with a controller.
In my opinion, builder pro is the best default configuration.
But then came the ability for controller players to set their own custom set of binds, like keyboard and mouse players.
This was a gamechanger.
Look, using custom binds lets you configure every button for combat, building, and editing. So you can tailor things exactly to your needs.
If you want to take your controller gameplay to the next level you should set up your own custom binds.
Of course, custom binds can be confusing because you have so many actions you need to configure.
So here I’m going to show you 3 custom controller binds that are excellent for standard controller users.
- Controller binds 1 – The best option for most standard controller players that play with a non-claw grip.
- Controller binds 2 – A variant of controller binds 1 with jump on R3, making it another good choice for non-claw players.
- Controller binds 3 – Slightly different to the other binds and an excellent choice for claw grip players.
Please use these controller binds as a template and I encourage you to make tweaks to further optimize them to your needs.
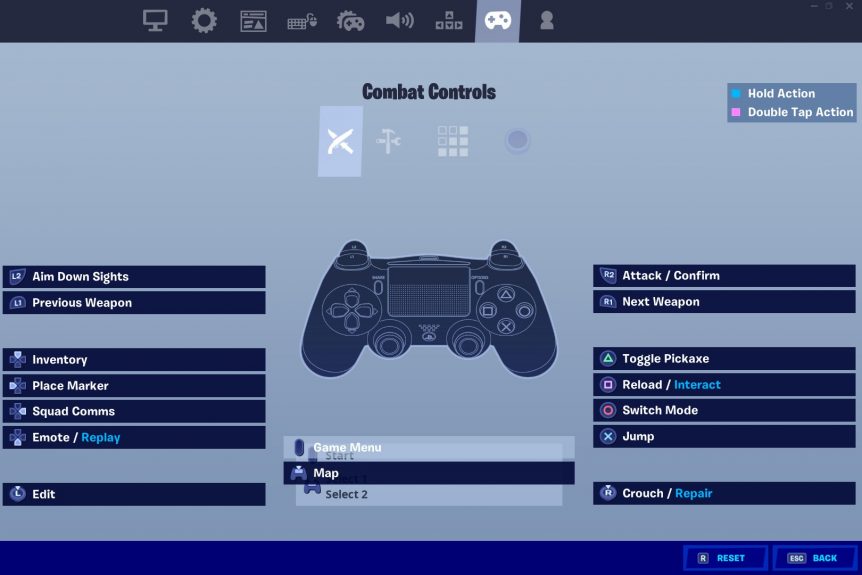
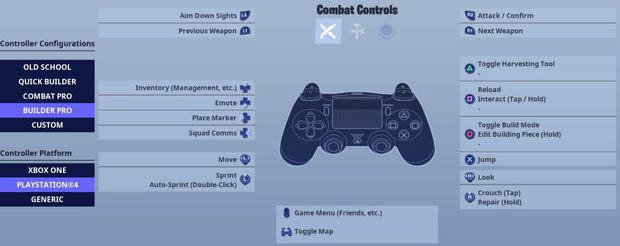
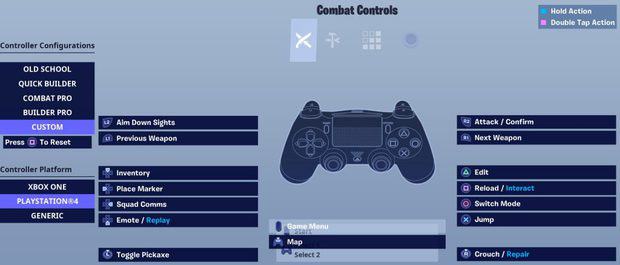
Controller binds 1 – combat

- L2: Aim Down Sites
- L1: Previous Weapon
- R2: Attack/Confirm
- R1: Next Weapon
- D-Pad Up: Inventory
- D-Pad Left: Place Marker
- D-Pad Right: Squad Comms
- D-Pad Down: Emote/Replay
- Triangle: Toggle Pickaxe
- Square: Reload/Interact
- Circle: Switch Mode
- Cross: Jump
- L3: Edit
- R3: Crouch/Repair
- Touch Pad: Map
- Options Button: Game Menu
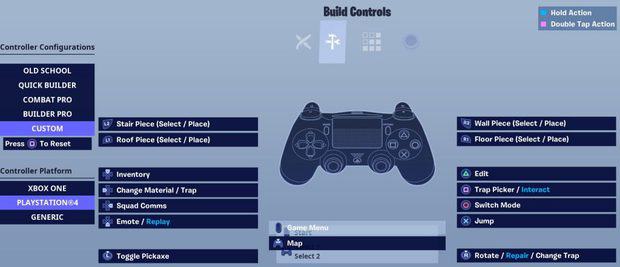
Controller binds 1 – building
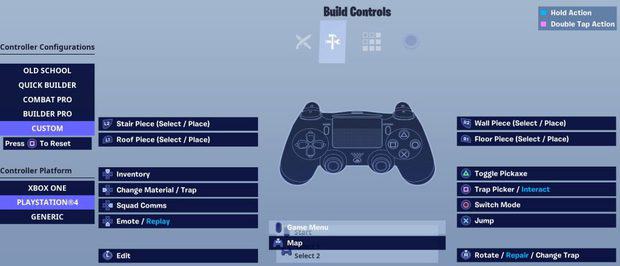
- L2: Stair Piece (Select/Place)
- L1: Roof Piece (Select/Place)
- R2: Wall Piece (Select/Place)
- R1: Floor Piece (Select/Place)
- D-Pad Up: Inventory
- D-Pad Left: Change Material/Trap
- D-Pad Right: Squad Comms
- D-Pad Down: Emote/Replay
- Triangle: Toggle Pickaxe
- Square: Trap Picker/Interact
- Circle: Switch Mode
- Cross: Jump
- L3: Edit
- R3: Rotate/Repair/Change Trap
- Touch Pad: Map
- Options Button: Game Menu
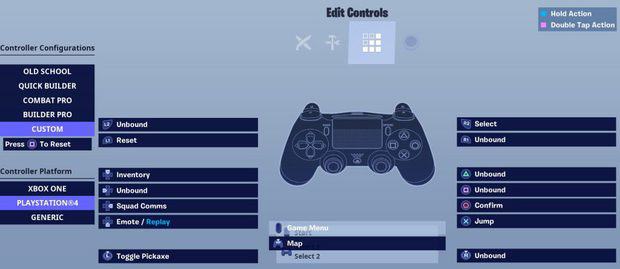
Controller binds 1 – editing

- L2: Unbound
- L1: Reset
- R2: Select
- R1: Unbound
- D-Pad Up: Inventory
- D-Pad Left: Unbound
- D-Pad Right: Squad Comms
- D-Pad Down: Emote/Replay
- Triangle: Toggle Pickaxe
- Square: Unbound
- Circle: Confirm
- Cross: Jump
- L3: Unbound
- R3: Unbound
- Touch Pad: Map
- Options Button: Game Menu
Controller binds 2 – combat
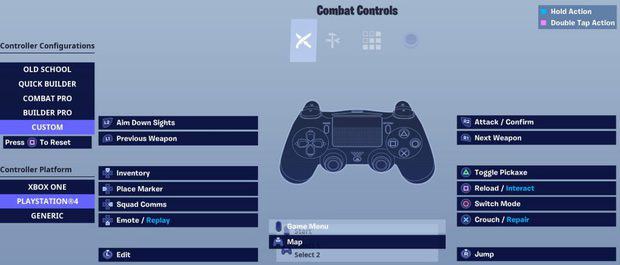
- L2: Aim Down Sites
- L1: Previous Weapon
- R2: Attack/Confirm
- R1: Next Weapon
- D-Pad Up: Inventory
- D-Pad Left: Place Marker
- D-Pad Right: Squad Comms
- D-Pad Down: Emote/Replay
- Triangle: Toggle Pickaxe
- Square: Reload/Interact
- Circle: Switch Mode
- Cross: Crouch/Repair
- L3: Edit
- R3: Jump
- Touch Pad: Map
- Options Button: Game Menu
Controller binds 2 – building
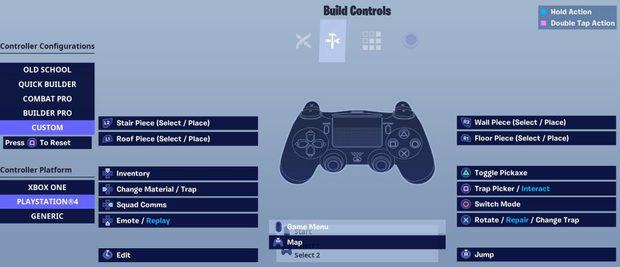
- L2: Stair Piece (Select/Place)
- L1: Roof Piece (Select/Place)
- R2: Wall Piece (Select/Place)
- R1: Floor Piece (Select/Place)
- D-Pad Up: Inventory
- D-Pad Left: Change Material/Trap
- D-Pad Right: Squad Comms
- D-Pad Down: Emote/Replay
- Triangle: Toggle Pickaxe
- Square: Trap Picker/Interact
- Circle: Switch Mode
- Cross: Rotate/Repair/Change Trap
- L3: Edit
- R3: Jump
- Touch Pad: Map
- Options Button: Game Menu
Controller binds 2 – editing

- L2: Unbound
- L1: Reset
- R2: Select
- R1: Unbound
- D-Pad Up: Inventory
- D-Pad Left: Unbound
- D-Pad Right: Squad Comms
- D-Pad Down: Emote/Replay
- Triangle: Toggle Pickaxe
- Square: Unbound
- Circle: Confirm
- Cross: Unbound
- L3: Unbound
- R3: Jump
- Touch Pad: Map
- Options Button: Game Menu
Controller binds 3 – combat
- L2: Aim Down Sites
- L1: Previous Weapon
- R2: Attack/Confirm
- R1: Next Weapon
- D-Pad Up: Inventory
- D-Pad Left: Place Marker
- D-Pad Right: Squad Comms
- D-Pad Down: Emote/Replay
- Triangle: Edit
- Square: Reload/Interact
- Circle: Switch Mode
- Cross: Jump
- L3: Toggle Pickaxe
- R3: Crouch/Repair
- Touch Pad: Map
- Options Button: Game Menu
Controller binds 3 – building
- L2: Stair Piece (Select/Place)
- L1: Roof Piece (Select/Place)
- R2: Wall Piece (Select/Place)
- R1: Floor Piece (Select/Place)
- D-Pad Up: Inventory
- D-Pad Left: Change Material/Trap
- D-Pad Right: Squad Comms
- D-Pad Down: Emote/Replay
- Triangle: Edit
- Square: Trap Picker/Interact
- Circle: Switch Mode
- Cross: Jump
- L3: Toggle Pickaxe
- R3: Rotate/Repair/Change Trap
- Touch Pad: Map
- Options Button: Game Menu
Controller binds 3 – editing
- L2: Unbound
- L1: Reset
- R2: Select
- R1: Unbound
- D-Pad Up: Inventory
- D-Pad Left: Unbound
- D-Pad Right: Squad Comms
- D-Pad Down: Emote/Replay
- Triangle: Unbound
- Square: Unbound
- Circle: Confirm
- Cross: Jump
- L3: Toggle Pickaxe
- R3: Unbound
- Touch Pad: Map
- Options Button: Game Menu
Conclusion
You now have your controller sensitivity, settings, and binds configured like a Fortnite pro player.
Obviously, using the same settings as a pro isn’t going to instantly turn you into a pro.
But it’s a step in the right direction and it’s certainly better than using bad settings, or the mediocre default settings.
Of course, there is no such thing as the “best” setting, sensitivity, and binds. Because we’re all different and there is no single configuration or value that will suit everyone.
I hope that you have learned something new from this post and it has helped you optimize your controller settings and given you the tools you need to take your gameplay to the next level.
What controller settings, sensitivity, and binds are you using?
Let me know in the comments below!
Comments
Thznk yoi bro
You’re welcome!
best controller settings ever!!! they improved me so much at the game great job
I need help editing in aiming
But what about deadzones for controller players and the new input curve settings
great tips thx so much i won a cash cup because of this !!!!
Dope
Amazing 💪🐥🐥🐥🐥🐥😁😁😁😁😁 thnx for the advice
nice
thank you bro
You’re welcome.
Im gonna put these settings tommorow and use thwm I will get 10 times better
Why controller players change the pc settings to do this something or best let et be on defoult
Can you do this for a xbox elite v2 controller since Xbox doesn’t have touch pads
Thanks for the settings they are very good
very good setting super ood for youur binds it kep me a lot.