A lot of new settings were added in Fortnite Chapter 2.
The menus got a whole new look.
And some settings were moved around.
You can tweak a bunch of stuff in your Fortnite settings like your graphics quality, audio, and HUD options.
But because there are so many menus and so many things to configure, it’s easy to get confused and overwhelmed.
In this post, we’re going to go through every possible setting you can configure in Fortnite one page at a time together so you can be confident that you’re using the best settings in Fortnite.
You’re not only going to learn what settings to use because you’re going to learn why you should use them, as well.
Now there are a lot of pages that we have to get through, but I promise in the end it will all be worth it as you’ll have every setting in Fortnite fully optimized.
Are you ready to begin?
Video settings
Let’s start with your video settings.
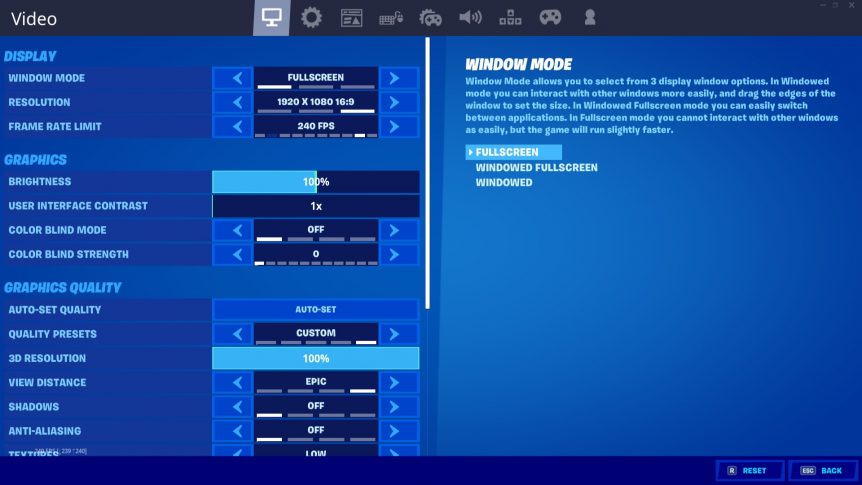
There are a few different sub-sections within the video settings, so let’s go through each individually, starting with the display settings.

- Window Mode: Fullscreen – You always want to use fullscreen mode as it will make Fortnite run faster, decrease input lag, and increase your FPS. You see, using either of the windowed modes could cause problems with your mouse alignment.
- Resolution: 1920 x 1080 (16:9) – Most monitors are 1920 x 1080 so I recommend using this since it’s the resolution that Fortnite will look best on. You could use 1600 x 900 to get more FPS, but your game will look slightly worse. These resolutions aren’t stretched as the aspect ratio is 16:9 and you can follow this guide to using a stretched resolution in Fortnite.
- Frame Rate Limit: 240 FPS – This setting will depend on the refresh rate of your monitor. Since I have a 240 Hz monitor, I use a 240 FPS frame rate limit. So you can set it to 144 FPS if you use a 144 Hz monitor and 60 FPS if you have a 60 Hz monitor. Using unlimited can cause stutters and FPS drops, so I don’t recommend using it.
Now that you’ve set up your display settings, let’s move onto the graphics settings.
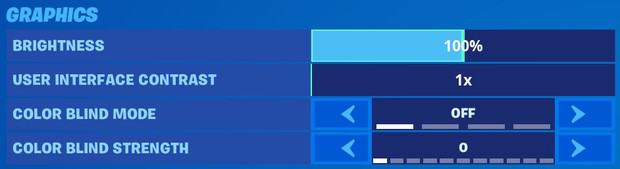
These settings have no impact on your game’s performance but do change how things look.
- Brightness: 100% – You want to set this high enough so you can clearly see enemies, even in dark areas. Depending on the brightness settings of your monitor, you may want to set this higher or lower.
- User Interface Contrast: 1x – This merely adjusts the contrast of the user interface and is a personal preference, so use what you find looks the best.
- Color Blind Mode: Off – Color blind mode used to be important in Fortnite Chapter 1 because certain settings allowed you to see easier into the storm. But as of Chapter 2 they made the storm transparent and easier to see with all settings. So use the color blind mode and strength that enables you to see colors clearly and differentiate between them.
Scrolling further down we have the graphics quality settings.
Your graphics quality settings are important as they impact your performance.
I recommend not using the auto-set quality option because it will automatically configure your graphics quality options based on a benchmark of your computer’s hardware.
Instead, you should set each of your graphics quality settings individually the get the best performance and highest FPS.
Your goal should be to get more FPS because high FPS increases animation smoothing, decreases input lag, and overall makes you a better Fortnite player.
Here are the graphics quality settings I recommend using:
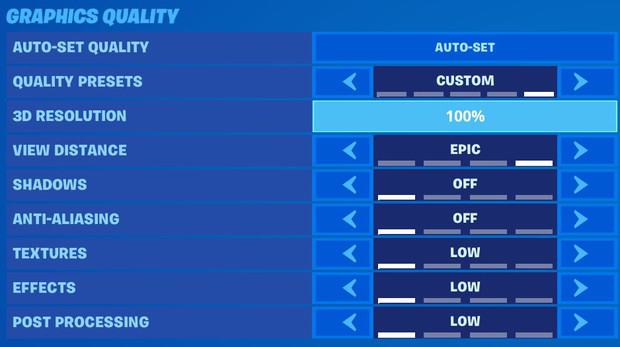
You can see we have everything set to low or off, with the exception of view distance.
Sure, using low setting means that Fortnite doesn’t look as pretty. But we’re not interested in a pretty game, we’re interested in getting the best performance.
Read on for an explanation of each setting.
- 3D Resolution: 100% – This determines the resolution objects are shown in-game. Fortnite will look best at 100%, but you could lower it if you want to further increase your FPS.
- View Distance: Epic – Closer view distances can improve performance on a slower device, but further view distance can be an advantage. There isn’t much difference in the FPS of different settings, so I suggest using Epic because it can be an advantage.
- Shadows: Off – Shadows are a major GPU resource and turning this setting off results in a big FPS boost, so turn them off. Shadows do have a major impact on how Fortnite looks and turning shadows off can help you to see enemies more clear in dark areas.
- Anti-Aliasing: Off – Anti-Aliasing smooths edges on 3D objects, so they look more smooth and less pixelated. It’s really hard to tell the difference between Off and Epic, so just turn it off for the extra FPS boost.
- Textures: Low – Higher texture settings give flat objects a more detailed appearance, but because of the cartoon-style graphics in Fortnite it’s hard to tell the difference between Low and Epic. Again, set it to the lowest for the extra FPS.
- Effects: Low – Higher effects settings add details to certain objects and interactions in Fortnite, but we don’t care about pretty things so turn it off for the best performance.
- Post Processing: Low – This is a setting that you won’t notice when playing at 1080p, and setting it to low can raise your frame rate with only a minor impact on quality. And as you’ve already set everything to the lowest, it makes sense to set this to low, as well.
Now that you have your graphics quality configured to the optimal settings that the best and most competitive Fortnite players use, it’s time to move on to the advanced graphics settings.
Here are my recommendations:
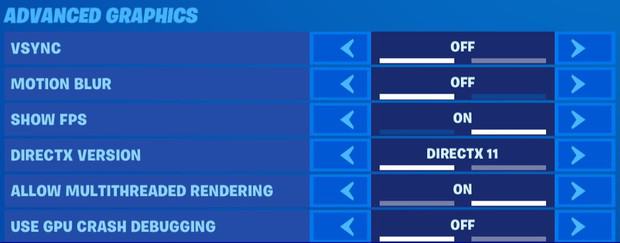
- Vsync: Off – Vsync eliminates screen tearing by always rendering and presenting a full frame. But Vsync causes input delay and lower frames. So turning off Vsync can give you higher frames and better input response.
- Motion Blur: Off – Motion blur has no impact on your FPS, but some people are very sensitive to motion blur and it can cause nausea. So you should also turn motion blur off.
- Show FPS: On – You want this enabled so you can see your FPS as you play Fortnite to determine whether you need to make any further changes.
- DirectX Version: DirectX 11 – DirectX 11 is the default setting and has been more extensively tested and generally it performs better. But you may need to do some of your own tests to figure out which DirectX version works best for your particular system.
- Allow Multithreaded Rendering: On – Multithreaded rendering splits work across multiple threads and can dramatically improve performance on multi-core processors. But it can cause hitches and lower FPS on weaker and older hardware. I recommend turning allow multithreaded rendering on if your CPU has 4 or more cores.
- Use GPU Crash Debugging: Off – If you experience crashes when playing Fortnite, then you may consider enabling this to help developers track down the root cause of your problem. But enabling it does come at a performance cost, so we’ll turn it off.
When you use these video settings in Fortnite, you will be optimizing your game for the best performance.
Of course, if you don’t mind having lower frames then feel free to set your graphics quality settings higher.
And if you want to further optimize your system then you should read this guide to increasing your FPS in Fortnite.
Game settings
Now we’re on the second page of your Fortnite settings. The cog icon or game settings.
First, let’s set up the language and region settings.

- Matchmaking Region: Auto – You want to use the matchmaking region that’s closest to you and gives you the lowest amount of delay (ms). Using Auto picks the server with the best connection. Read this to learn how to lower your ping in Fortnite.
- Language: System Default – This sets the language of the game. It’s pretty self-explanatory so use your native language for this setting.
Let’s go on to your movement settings.

- Toggle Sprint: Off – This sets sprint to be an on/off toggle or hold to sprint. Because you don’t want to sprint on a toggle you want this off.
- Sprint By Default: On – Turning sprint by default on sets your default movement to sprint. You always want to be sprinting in Fortnite, so turn it on. All the best Fortnite players use sprint by default and it frees up an extra keybind for you to use for something important.
- Sprint Cancels Reloading: Off – You want to be able to reload when sprinting, so turn this off.
- Auto Open Doors: On – When this is on you will automatically open doors when you approach them. I like using auto open doors because if I fail an edit and make a door then my character will automatically go through it and don’t lose time.
Next, combat settings.
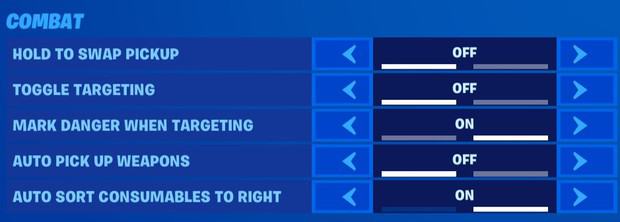
- Hold To Swap Pickup: Off – I suggest turning this off because it can make you accidentally swap your current weapon with a weapon on the ground.
- Toggle Targeting: Off – This sets targeting to be an on/off toggle or a hold. I suggest having it off as it will allow you to do quick aim down sites (ADS) shots, which is useful when fighting with a shotgun.
- Mark Danger When Targeting: On – If you ADS when placing a marker, then a danger marker will be placed instead of the default location marker. This is useful for alerting your teammates to danger, so turn it on.
- Auto Pick Up Weapons: Off – Unless you want to automatically pick up weapons when you move over them, turn this setting off.
- Auto Sort Consumables To Right: On – When on, consumable items such as heals and shields will be placed by default in your rightmost empty slot. I recommend turning this on since you usually want your consumables placed on the right.
Next we have your building settings.
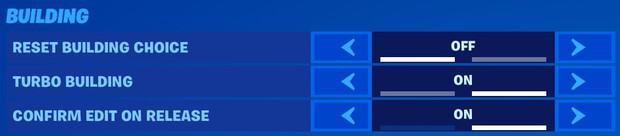
- Reset Building Choice: On – When on, switching to build mode will always bring up the first building piece (your wall). When off, the game will remember the last building piece you were using and automatically bring that up. For consistency, I suggest turning this on.
- Turbo Building: On – Turbo building allows you to hold down your build button to automatically continue building a selected piece as you look around. You definitely want turbo building on, unless you want to place each building piece with a click (you don’t).
- Confirm Edit On Release: On – Confirm edit on release allows you to automatically confirm an edit when you release your select building edit (left mouse button or left trigger for controllers). I suggest turning this on as it allows you to edit faster unless you use double edit keybinds.
For the tutorial settings, I keep the contextual tips on because that’s how I’ve always had it and it shows helpful tips for new players.

Now, let’s look at your Extra game options.
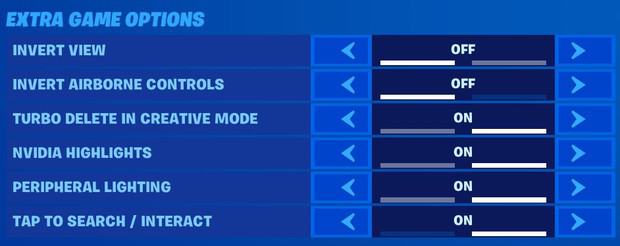
- Invert View: Off – When this is on, your character will look down when the control is moved up. In other words, up is down and down is up. Most payers will want this off.
- Invert Airborne Controls: Off – When this is on, pressing forward will pitch the aircraft down. So this depends on how you want to control an aircraft but most people are going to want this off, as well.
- Turbo Delete In Creative Mode: On – This will allow you to rapidly delete things in creative mode by holding down the delete button.
- Nvidia Highlights: On – When this is on, certain game events like winning, getting eliminations, or being eliminated are automatically recorded and this can be useful for content creators. But you will need specific Nvidia hardware for this feature.
- Peripheral Lighting: On – Turning this setting on will allow Fortnite to control the lighting on supported peripherals. For example, the colors of your mouse and keyboard can change in ways that reflect your game.
- Tap To Search/Interact: On – Using tap to search/interact allows you to search/interact with a single press instead of holding it down for the duration of the timer. I recommend turning this on as it can free up your finger when you search/interact with things.
And the final thing to configure on this page are your Replay settings.
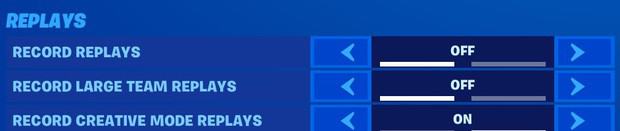
- Record Replays: Off – When on, replays are recorded and stored after each match. But recording replays can reduce performance and take up hard drive space, so I suggest turning it off.
- Record Large Team Replays: Off – When on, replays are recorded and stored after each match with large teams, such as 50v50 or teams of 20. Again, this can reduce performance and take up hard drive space, so I suggest turning it off.
- Record Creative Mode Replays: On – When on, replays are recorded for Creative Mode matches. I have this on because I don’t care too much about my performance in Creative mode and I like to use the Creative mode replays for getting thumbnails for content.
Game UI settings
The third page is your Game UI settings, which lets you configure your user interface.
These settings will impact how your HUD (heads-up display) looks and will change how the information is visually relayed to you in-game.
A lot of these settings provide you with useful information and you’ll want most of them on. But there are some that you may want off.
Let’s go through each one and allow me to explain what each setting does.
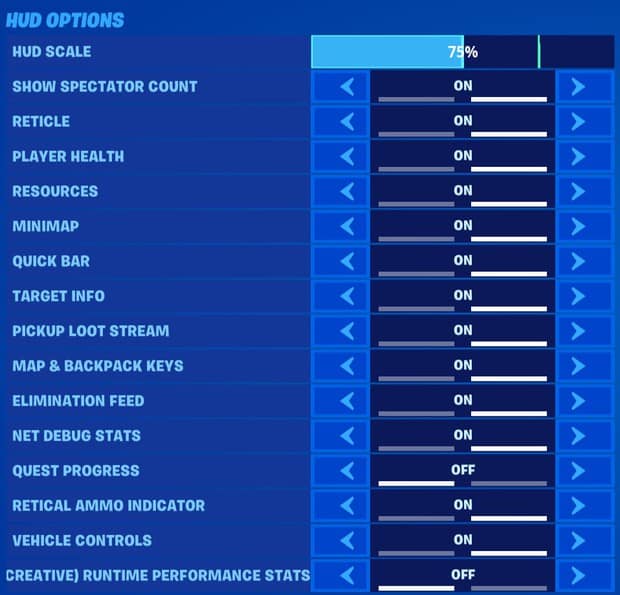
- HUD Scale: 75% – Sets the size of the HUD elements. 100% is the default size and lower settings will make HUD elements smaller. I recommend setting this lower than 100% to make the HUD smaller so you can see more, but you still want it big enough so you can see your HUD clearly.
- Show Spectator Count: On – This will show a count of players spectating you in-game in the lower left. I like to have this on so I can see how many (if any) players are spectating me. Some players get nervous when being spectated and may want to turn this off.
- Reticle: On – Your reticle is your crosshair and you’ll want this on so you know where to aim.
- Player Health: On – You want this on so you can see your health and shields to know when you need to heal.
- Resources: On – You need this information so you know how many materials you have left to build with and if you should start farming for more materials.
- Minimap: On – You want your map on so you can quickly see where you are and what’s around you.
- Quick Bar: On – The quick bar is the part of the HUD that shows your inventory, so you’ll definitely want this on so you can see the weapons and consumables that you have and if you need to rearrange and optimize the order of your inventory.
- Target Info: On – Shows you how much health is left on an object. For example, you’ll be able to see if a tree is one hit from breaking when you turn target info on.
- Pickup Loot Stream: On – This is the small stream of information that shows you how many resources and ammo you pickup when looting. Even if you only look at the total number, this is still useful information to know.
- Map & Backpack Keys: On – This will show the map and inventory icons, as well as if you’re carrying any reboot cards or keycards, so turn this on.
- Elimination Feed: On – Seeing the elimination feed can be useful, especially when there are fewer players left in the game. It can let you know if enemies have been eliminated or downed, which is helpful when you’re playing duos or squads.
- Net Debug Stats: On – Turning this on shows your ping in the top left of your screen and other useful network stats such as download speed, upload speed, and packet loss. Useful to track your connection and ping throughout a game.
- Quest Progress: Off – Turning this off will hide your progress of quests that can get distracting when playing.
- Reticle Ammo Indicator: On – The reticle ammo indicator shows you how much ammo you have left in your weapon. This is useful information to know but some players may find the reticle ammo indicator annoying and will want to turn it off.
- Vehicle Controls: On – If I haven’t played in a while, or if a new vehicle has been introduced, then I may forget the controls for some vehicles so keep this on.
- (Creative) Runtime Performance Stats: Off – Turning this on will show information about the game thread time, render thread time, total GPU time, RHI thread time, total draw calls, and total primitives drawn when in Fortnite Creative mode. I’m not interested in these metrics, so I have it turned off.
Onward.
Mouse and keyboard settings
Here you can configure your mouse sensitivity.
Your X-axis sensitivity sets the sensitivity of your mouse movements in the horizontal (x) axis. With higher settings, the camera will move faster when looking left and right with your mouse.
Your Y-axis sensitivity sets the sensitivity of your mouse movements in the vertical (y) axis. With higher settings, the camera will move faster when looking up and down with your mouse.
Because players use different mouse DPI, it can be difficult to give recommend a percentage value for your Fortnite sensitivity.
But I can suggest an eDPI to use.
Your eDPI (effective dots per inch) is calculated by multiplying your mouse DPI by your in-game sensitivity, which you can work out using my free Fortnite eDPI calculator.
Using between 45 eDPI and 100 eDPI in Fortnite is a good starting point for most players. You can use something like the PSA method to help find your perfect sensitivity.
And whatever sensitivity you choose to use, I suggest setting your X and Y sensitivity to the same value.
Feel free to experiment and try new values, as well. Because there is some evidence to suggest that trying new sensitivities can improve your mouse movements.
Mouse sensitivity in Fortnite is a very broad subject and there is a lot to talk about, so I suggest you check out this guide to Fortnite sensitivity to learn more.
Once you’ve set up your mouse sensitivity, you’re left with the mouse flight settings. I recommend using the following:
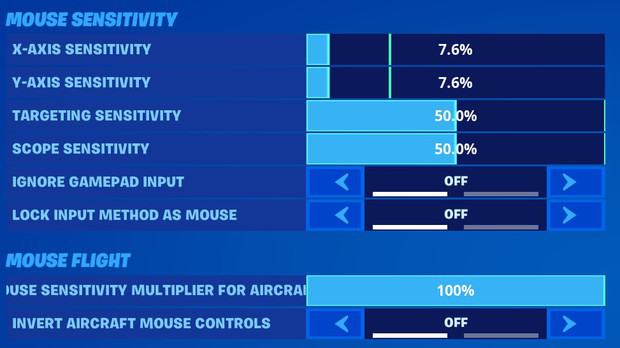
- Mouse Sensitivity Multiplier For Aircraft Steering: 100% – Use 100% so your mouse sensitivity settings are the same when you steer an aircraft
- Invert Aircraft Mouse Controls: Off – When off, moving the mouse downward will pitch the aircraft down, and moving the mouse forward will pitch the aircraft up.
Controller options
Here we’re going to configure all the options for a controller, starting with the input settings.
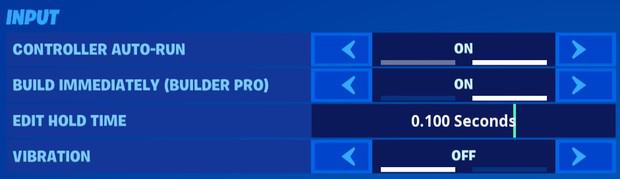
- Controller Auto-Run: On – When this is on, you can double click your movement stick to automatically run forward without the need to hold your stick forward. Useful for when you’re gliding in and want to take your hands off the sticks or if you want to rearrange your inventory while still moving forward.
- Build Immediately (Builder Pro): On – If you’re using builder pro, this will allow you to build immediately when switching to a different building piece.
- Edit Hold Time: 0.100 Seconds – This is the duration you have to hold your button to enter edit mode. You want to set it to the lowest possible number to enter edit mode quickly, so set it to 0.100 seconds.
- Vibration: Off – Vibration can be jarring and negatively impact your ability to play Fortnite well, so I suggest turning it off.
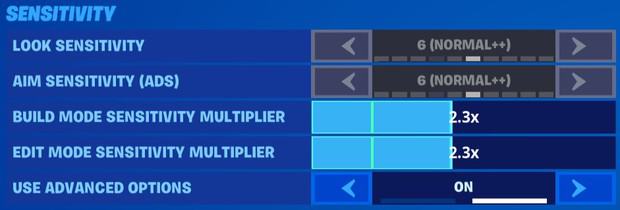
Next, let’s go through the controller sensitivity settings.
I have another post that goes into detail about the best controller sensitivity and here I want to give a brief summary.
Of course, there is a lot of personal preference when it comes to sensitivity and there is no one value that will work for all players.
So I’m going to give you a range of sensitivities to use and I suggest you select a number between these values.
- Build Mode Sensitivity Multiplier: 1.7x-2.5x
- Edit Mode Sensitivity Multiplier: 1.0x-2.5x
- Use Advanced Options: On
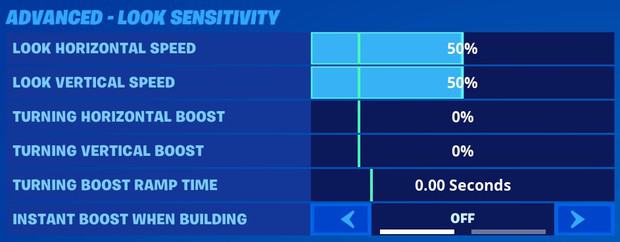
Now let’s move on to setting up your advanced – look sensitivity.
- Look Horizontal Speed: 40-60%
- Look Vertical Speed: 40-60%
- Turning Horizontal Boost: 0%
- Turning Vertical Boost: 0%
- Turning Boost Ramp Time: 0.00 Seconds
- Instant Boost When Building: Off
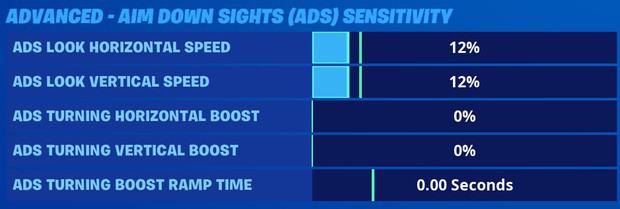
Next, we have your advanced – aim down sights (ADS) sensitivity.
- ADS Look Horizontal Speed: 8%-16%
- ADS Look Vertical Speed: 8%-16%
- ADS Turning Horizontal Boost: 0%
- ADS Turning Vertical Boost: 0%
- ADS Turning Boost Ramp Time: 0
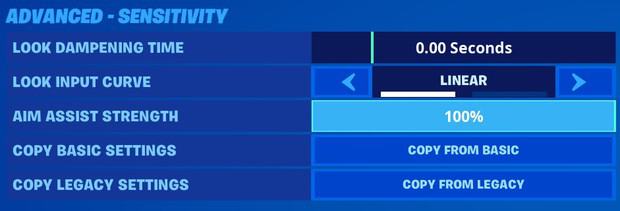
And next we have the advanced – sensitivity.
- Look Dampening Time: 0.00 Seconds
- Look Input Curve: Linear
- Aim Assist Strength: 100%
Now controller deadzone.
The deadzone is the area surrounding your stick that Fortnite ignores input from.
Setting this value too low may result in your character continuing to move (for move stick deadzone) or your camera continuing to move (for look stick deadzone) even after you remove your finger from the stick.
Here are the ranges I recommend using for your controller deadzone, but this may require some experimentation to find the perfect value.
- Move Stick Deadzone: 6%-12%
- Look Stick Deadzone: 6%-12%

And finally, turn foot controller off.

Audio settings
Here you can configure your audio settings, most of this is pretty straightforward, but let’s go through each of the settings anyway.
First starting with the volume settings.

- Music: 5% – This adjusts the volume of music in Fortnite, set this to whatever sounds best to your ears.
- Sound Effects: 50% – Sound effects are in-game sounds like gunfire, footsteps, and so on. You want this loud enough so you can hear things clearly.
- Dialogue: 10% – This adjusts the volume of dialogue for game characters and voice overs. Set to whatever you find sounds best.
- Voice Chat: 80% – Adjust this to get the volume of your friends in voice chat just right. Make them loud enough so you can hear them well, but not too loud that you can’t hear important in-game sound cues.
- Cinematics: 25% – You can change this to set the volume of cinematics or cut scene videos. Use whatever you find is best.
Now, onto the sound settings.
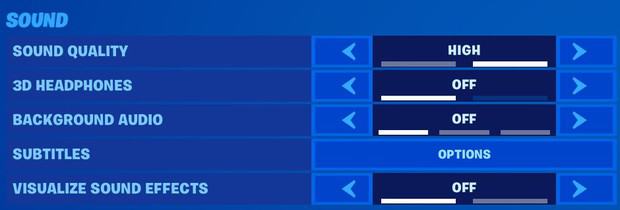
- Sound Quality: High – High quality sounds better, but it may decrease performance. In my experience, I haven’t noticed a performance decrease when using high sound quality, so I use it.
- 3D Headphones: Off – This setting enables binaural audio, which provides 3D audio spatialization so you can hear the location of sounds more precisely. But you’ll need a good pair of studio or stereo headphones to make use of this.
- Background Audio: Off – Sets the game audio when Fortnite is in the background. I sometimes have Fortnite minimized when doing things on another window, so I turn this off to not hear the music
- Visualize Sound Effects: Off – This turns the visual radial indicator for some sounds on/off. When on, you’ll see the visual radial indicator for some sounds, but in-game sounds will no longer pan or provide spatialization. So unless you have a hearing impairment, you want to turn this off
Now voice chat settings
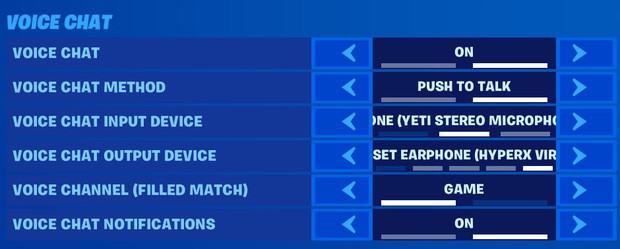
- Voice Chat: On – Turn this on if you want to hear your teammates and also talk to them by using a microphone. You can turn this off if you don’t want to hear or talk to your teammates.
- Voice Chat Method: Push To Talk – Using push to talk means that your teammates will only hear you talking when you press and hold the ‘push to talk’ button that you can set up in your keybinds. The alternative setting is open mic, which is when your mic is always on and your teammates hear you at all times. Push to talk is useful as it means your teammates will not hear anything from your mic when you’re not holding the push to talk key. But some players may find push to talk difficult to get used to and will prefer open mic.
- Voice Chat Input Device: Microphone – This sets the input device that will receive your voice that your teammates will hear, so select your microphone.
- Voice Chat Output Device: Headset – This sets the output device that you will hear your teammates, so select your headset.
- Voice Channel (Filled Match): Game – You can set the default voice channel for matches in which the empty slots are filled with random players to either game or party. Select game so you join the game chat channel, or party if you want to stay in the party chat channel with your non-fill teammates.
- Voice Chat Notifications: On – This sets the notification that appears when someone in your voice channel speaks. You could turn it off if you don’t want the notification.
The final setting that you can configure in your audio settings is Licensed Audio.
If you’re a content creator, you can select this option to avoid playing licensed music. But this setting doesn’t apply to certain even playlists that feature content that’s licensed, such as concerts.
You have 3 options for Licensed Audio:
- Play: The audio is played normally (default).
- Mute Others: When other players play licensed audio, the audio will be muted
- Mute All: All licensed audio will be muted if you or anyone plays them.
If you are a content creator and want to be safe, I recommend using the Mute All setting.

Keyboard controls
Here you can configure all of your Fortnite keybinds.
You can use the Select Preset option at the top to select either the standard (default) keybinds or the old school original controls for Fortnite.
I recommend you set up your own custom set of keybinds that work for you. You can check what Fortnite pro players are using as inspiration.
There are so many things to configure here and Fortnite keybinds are something that would need a whole other article to cover in detail.
Controller settings
Here you can set your controller configurations.
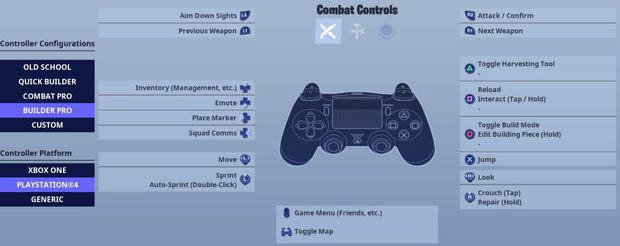
There are 4 preset options to choose from; Old School, Quick Builder, Combat Pro, and Builder Pro.
For most new Fortnite players, I recommend using Builder Pro as it is the best default controller configuration.
Another option you have is to set up your own custom controller configurations. So you can set up everything for combat, building, and editing.
Using a custom configuration is the best choice because you can configure your controller’s button layout exactly as you want.
Of course, setting up your own custom controller configuration can be a bit confusing if you don’t know where to start.
So here are the custom configurations that I recommend for players using a standard controller with a non-claw grip.
Combat controls:
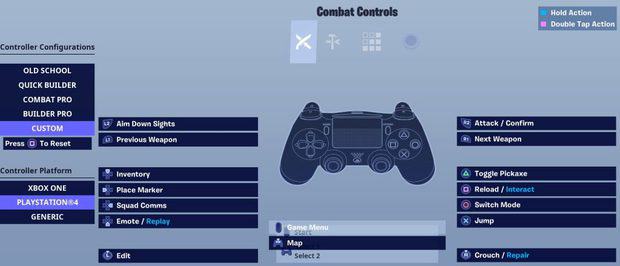
- L2: Aim Down Sites
- L1: Previous Weapon
- R2: Attack/Confirm
- R1: Next Weapon
- D-Pad Up: Inventory
- D-Pad Left: Place Marker
- D-Pad Right: Squad Comms
- D-Pad Down: Emote/Replay
- Triangle: Toggle Pickaxe
- Square: Reload/Interact
- Circle: Switch Mode
- Cross: Jump
- L3: Edit
- R3: Crouch/Repair
- Touch Pad: Map
- Options Button: Game Menu
Build controls:
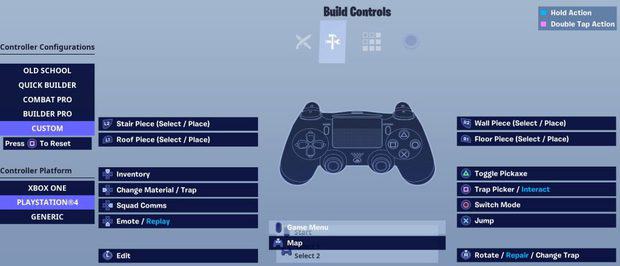
- L2: Stair Piece (Select/Place)
- L1: Roof Piece (Select/Place)
- R2: Wall Piece (Select/Place)
- R1: Floor Piece (Select/Place)
- D-Pad Up: Inventory
- D-Pad Left: Change Material/Trap
- D-Pad Right: Squad Comms
- D-Pad Down: Emote/Replay
- Triangle: Toggle Pickaxe
- Square: Trap Picker/Interact
- Circle: Switch Mode
- Cross: Jump
- L3: Edit
- R3: Rotate/Repair/Change Trap
- Touch Pad: Map
- Options Button: Game Menu
Edit controls:
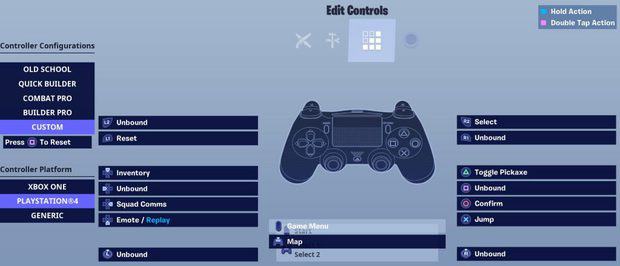
- L2: Unbound
- L1: Reset
- R2: Select
- R1: Unbound
- D-Pad Up: Inventory
- D-Pad Left: Unbound
- D-Pad Right: Squad Comms
- D-Pad Down: Emote/Replay
- Triangle: Toggle Pickaxe
- Square: Unbound
- Circle: Confirm
- Cross: Jump
- L3: Unbound
- R3: Unbound
- Touch Pad: Map
- Options Button: Game Menu
If you want to find out more about controller binds, check out this post.
Account and privacy settings
There are some settings that you can apply to your account here.
You can’t do it here, but I recommend enabling 2FA to keep your account secure.
First, these are the social privacy settings I suggest.
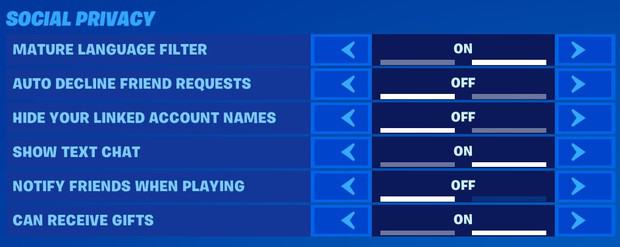
- Mature Language Filter: On – This will replace the characters in bad words when you communicate with other users. Feel free to turn this off if you don’t mind looking at bad words.
- Auto Decline Friend Requests: Off – Unless you’re a famous streamer or content creator and get a lot of friend requests, you’re going to want to turn this off so you don’t automatically decline all new incoming friend requests.
- Hide Your Linked Account Names: Off – Turning this on will hide linked social accounts from your friends. So this setting will depend on how private you want to be.
- Show Text Chat: On – Basically, this will show text chat. Useful for communicating with anyone that doesn’t have a microphone or if the microphone isn’t working as intended.
- Notify Friends When Playing: Off – Turning this on will send a push notification to friends on mobile devices when you begin playing. Your mobile friends could find this annoying, so I suggest turning it off
- Can Receive Gifts: On – If you want to be able to receive gifts from other players, turn this on. Who doesn’t want to receive gifts?
Now gameplay privacy settings.
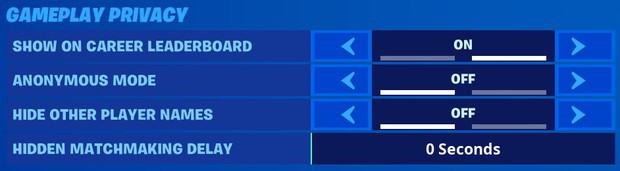
- Show On Career Leaderboard: On – This will determine whether you appear on the career leaderboard
- Anonymous Mode: Off – You can enable this setting to hide your name from non-squad members. Turning this on will replace your name to players that are not in your squad with “Anonymous” and it’s a useful setting for streamers that want to hide their identity. Otherwise, you’ll likely want it off.
- Hide Other Player Names: Off – You can enable this setting to replace the names of other players who aren’t in your squad with “Player” and this is another useful setting for streamers to protect their privacy in a game of Fortnite
- Hidden Matchmaking Delay: 0 Seconds – This setting creates a random delay during matchmaking and hides matchmaking status updates. The random delay is chosen between 0 and the number of seconds you select, up to 100. This is a useful setting for streamers that want to prevent stream sniping. But enabling this setting will cause longer queue times, so unless you’re a streamer you should set it to 0 seconds.
Conclusion
Congratulations if you’ve made it this far.
Fortnite is a game that allows you to customize a wide array of different settings. And some settings are confusing and not very intuitive.
I know that we just went through a lot and I hope you have found this article useful and it has helped you configure your Fortnite settings in the best way.
If there are any settings that you’re still not sure about or if you have any questions, please feel free to leave a comment below and I will reply to you.
Comments
I am planning to get a 240 fps pc setup with at least an i7 processer. but my budget is $1500. I already recieve emails from you they are very helpful. I am also trying to become a content creator
You’ll be able to get a very powerful PC with that budget. But I would recommend an AMD processor since they are a better choice right now.
Yo can help me grow my youtube
Make amazing content.
Thank You For Showing Us the *BEST* Fortnite setting We appreciate it.
hey Kr4m, i just wanted to know what your keybinds are. 🙂
Q, E, and side mouse buttons for building. Number keys for weapons. Shift to crouch. F to edit.
You are the best
Your instrcsin for the setings are the best and the most acuret
thanks for the tutorial…